Tuesday, January 31, 2012

The Tee-Shirt Quilt Part One!

Today I started Bryn's tee-shirt quilt.  She brought a garbage bag full of tee-shirts she wants me to turn into a quilt for her graduation gift.  So the Quilt Fairy (me) began to do her magic!  

Step one is dumping out all the tee-shirts on the floor.  Guapo, the dog, loves to lie on piles of clothing on the floor.  It's probably why he liked hanging out in Colleen's room so much!


Guapo on a pile of tee-shirts.

To prepare a shirt you have to look at the shirt to see where the image is and how big it is.  This one also has a full sized image on the back so I need to be careful when I cut up the shirt.  That said, remember this is rough cutting.  The first cut is the most difficult.  It gets easier the more shirts into it you get.


The picture of me cutting off the sleeves didn't come out.  It was too hard to put them back on to re-enact the cutting off.  Use your imagination.  


Next I cut up each side.


Next I spread it out


Then cut across the top of the front and the back.


This shirt only had a small image on the upper chest.  
Be sure to leave plenty of room around the image for "floating" space and seam allowance.

To get the cut images ready to be put into a quilt you need to stabilize the tee-shirt pieces with fusible interfacing.  If you don't stabilize them the quilt will stretch out of shape.  I use lightweight or featherweight fusible interfacing.  The first few tee-shirt quilts I made I used a regular iron.  It' took 6-7 hours just to fuse all the interfacing on!  I invested in a steam press and now it's a snap!

Hot Mama!

I put a piece of muslin over the lower plate to protect it.  I don't want goop all over it.  It's easier to wash or replace the muslin than to replace the plate!

Hot Mama with protection.

I lay out the tee-shirt in need of stabilizing and measure out how much stabilizer I need.


Once it's cut to size I makes sure to put it on the back.  I REPEAT!!!! MAKE SURE YOU PUT THE STABILIZER ON THE BACK!!!  You only have to do it once and, trust me, tears do not get all the gunk off!  Even if it's bigger than needed, you will use the excess.  

Ready for the press.

Double checking it's on the back!

On the press.  Make sure there are not wrinkles.  Ready to go!

And we press....for about 10 seconds.
Usually it takes 3 presses per full sized image.  Just have to be careful not to touch the upper plate when rearranging the tee-shirt. 

Next you have to center the image and decide how much excess you want around the image.  It's usually determined by how much room is at the top.

Centering the image.

Taking the upper corner as high as it would go.  2" from the top of the image.

I would leave 2-3" below the bottom of the image.  I didn't get a picture of the sides but it was just over 2" on each side.

Stabilized excess.

I save the excess to use to fill in the blanks as we go on.  You'll understand better as we go on.

Tee-shirt remnants to be used later.

More tomorrow!

Happy Stitching!

Monday, January 30, 2012

Busy Day!

I got a good workout in this morning then had coffee with my dad.  At 90, he still swims 40 lengths 3 times a week in the winter, 5-6 days a week in the summer.  I then ran to a quilt store on the other side of the health club and ran into my friend, Mary.  I found a few more I Spy fabrics but I think I'll have to go online to find some more in the colors I want from online stores.  I've had the best luck at Equilter.com, Fabric.com and Fabricshack.com.

So, on to the afternoon activities.  I decided to play with the Acuquilt and use it to cut out a sample block.  I couldn't get a good picture of the die so in a nutshell the squares are set askew so it goes under the roller more easily.  The problem is that it is difficult to line up the fabric to be on-grain unless you pre-cut the fabric to almost the size.  I did the best I could to line the fabric up-a piece that was about the size of a fat quarter.


Lined up and ready to go through.

Midway through.

I had to cut the central square-4-1/2", 4 2-1/2" squares, and 2 sets of triangles for the flying geese units.

I then cut 1-1/2" strips using the Acuquilt.  These are cut width of fabric and I just cut 9" off the fabric and put it on the machine and cranked it through.  Well, as I always say "Shift Happens" and sure enough, it did!  Apparently I did not put the edge of the fabric  at the very end and the fabric mooshed out the other end pushing the folded end of the fabric of the end of the blades so not cutting the full length of the  fabric.  It looked like a black hula skirt!  (Note to self-keep this in mind for next Hawaiian party).
Black Hula Skirt

Fortunately, it was easy to cut apart and the strips looked fine.  I did the white strips next and placed the  fabric correctly.

I then started making the blocks by starting with the flying geese units.  Much to my dismay the triangles didn't match up perfectly as I would expect with die cuts.  But they did line up close enough.  Let's face it, I've been dealing with my cutting for years-I can deal with it!


Lining up the triangles.

The rest of the piecing went smoothly and I'm happy with the results.

Finished sample block

So, do I like the Acuquilt?  It's a fun toy.  I know lots of people hate cutting the fabric and some even have physical limitations which the Acuquilt makes cutting the fabric possible.  But you still have to cut the fabric to a size that will fit in the machine.  I WOULD LOVE to have it for cutting unusual shapes like the bands on a wedding ring quilt, applique shapes and for scrappy quilts when you are using scraps of fabric and not big pieces.  Since my new obsession is using up my scraps (after I finish more of my UFO's) I CAN see myself using this a lot to cut my scraps to size.  Thank goodness Mary made the investment and let me use it!  (Thank you, Mary)  I have invested in some dies-some at Houston and some on sale at JoAnn's.  I would say it would be a fun toy to share with a group of friends.

On another note, a few weeks ago I made a counted cross stitch for a fundraiser one of my daughters' was spearheading for a friend with cancer.  The fundraiser was geared to young professionals in their 20's so I had to come up with something they would like and could relate to.  One of my other daughters introduced me to Subversive Cross Stitch.  I found one that said "F#@k Cancer" with hearts and birds and bunnies.  I made it, framed it and sent it to the fundraiser.  It brought in $110!  And others wanted them so I told my daughter if they would be willing to pay the same as the winning bid I'd make up more!  One of the requests came from the girl with cancer.  Needless to say, I already had all the supplies to make her one.  Just when I think I'm back on track, another project-or few-comes up!

Happy Stitching!

Sweatshirt Throw

Yesterday I spent the day running a few errands then putting the sweatshirt throw together.  I'm really pleased with how it turned out.  Technically, it's not a quilt because it doesn't have 3 layers but I think it qualifies as re-purposing clothing!  The sweatshirts were in the bag that my youngest sent me filled with the tee-shirts she wants made into a quilt for her college graduation.


All laid out
I made it so the seams were exposed on the print side of the sweatshirt so the back, with the warm, fuzzy surface, would be smooth.

You can't see it very well but I "ragged" the seam allowances. 

Fuzzy smooth side.

I have my workout this morning, run to another quilt shop to try to get more I Spy fabrics then home to either play with the Acuquilt or start fusing the interfacing to the tee-shirts for that quilt.

Happy Stitching!

Saturday, January 28, 2012

Best Laid Plans...


Busy day yesterday.  Workout at the gym, meeting with the decorator at my house then going over to my dad's to get his sunroom and bedroom rearranged and updated.  I finally got down to my sewing room at almost 4pm to start the Free Motion Quilt Along that Leah Day is doing once a week this year.  I'm only 4 weeks behind and was planning on doing one 4 days in a row to catch up and doing the Free Motion Quilt Project on the other days.

Sorry-I flipped it in the iPhoto but it didn't flip when I transferred it here.

 I WILL get better with my machine quilting!  Anyway, I was working on the Quilt Along and my machine started squeaking!  Not a good sound.  So I packed it up and it's going to the machine doctor today.  Unfortunately he doesn't pick up from the dealer until next Tuesday so I won't get it back until next Friday.  I really like quilting on this machine-a Viking Sapphire-which has a larger opening to be able to move the quilt around as I free motion quilt.  Fortunately I have other machines so I can  piece while the other's at the doctor's.  So I started working on my daughter's sweatshirt throw.
Here the throw is "thrown" on the floor!

I'm still working out how I'm going to put it together I'll make it "rag style" with the cozy nubby part exposed on the back and will be the smooth side with the raw seams on the front with all the writing.

I also found out my trainer is pregnant so I'm going to make her a quilt.  She's not going to find out what it is before so I'll do a generic one with primary colors.  I dreamt about it last night and checked out the dies I have for the Acuquilt and I think I have everything I need.  Bonnie Hunter has a cute I Spy Quilt in the Ohio Star pattern with black and white check sashing.  I love it and, since I won't be having grand children any time soon, it will give me an excuse to make it for her.  I've been working out with this trainer for a year and a half and really like her and how she's whipped my body back in shape!

Waiting for a delivery that needs a signature then off to run errands then hit the sewing room!

Happy Stitching!


Friday, January 27, 2012

Getting Caught Up


I was going to post yesterday's activities last night but got distracted!  (What's new?)  

I thought today I'd show you how I set up my work area for doing the Quilting Project and the materials I use.  I do follow a lot of what Leah Day suggests but I do prefer Neutrogena Norwegian Formula Hand Cream as Diane Gaudinski suggests instead of the gloves Leah uses.  


I have been fortunate enough to have taken machine quilting classes from Diane Gaudinski and Harriet Hargraves-probably the most recognized names in machine quilting.  If given the opportunity, I would take Harriet first then Diane.  That last sentence almost sounds like I'm a prize fighter planning my next fights!  Anyway, let's get back on track!

I'm getting back to my quilting daily and doing the Free Motion Project.  I'm also going to start doing her current "exercises".  And start Bryn's Graduation Quilt.  Anyway, this is how I have my sewing area set up to watch the lessons on the computer.

Setting it up right next to the sewing surface lets me review if I get confused.

I have pre-cut the fabric squares and batting squares so I can just pick them up and go.  I also like to listen to music while I quilt.  I get too distracted if I have the TV on while quilting.  I can have it on while piecing but I need to concentrate while actually quilting.  I subscribe to Pandora on my iTouch.  I'm planning on upgrading to an iPhone the next time I'm eligible for an upgrade.

This is the area to my left while sitting at the machine.  Notice my project board in the background to help keep me on track!

Yesterday's 5 designs.

Acuquilt Go!

My friend, Mary, got an Acuquilt when she first started quilting.  I've played with it once and picked up some more dies when I went to the Houston Quilt Festival last November.  She brought the Go over on Tuesday for me to play with.  I've planned a "play date" for this weekend.  Like I need to cut out another project!  I'm thinking of doing a disappearing 9 patch or cutting some half square triangles to hand piece.  I'm leaning toward the 9 patch.

Happy Stitching!


Thursday, January 26, 2012

Back to Practicing My Quilting

One of my goals for this year is to expand and improve my machine quilting.  I came across Leah Day's Free Motion Quilt Project which started as 365 different fill designs-one a day for a year.  A few years ago (I believe it was) she posted a video each day showing how to do a different fill design.  She believes, as I am finding out, you need to practice your quilting skills daily (or almost daily-life does get in the way sometimes!) to get better.  But then again, that's true with just about any skill.  (Okay, I'm getting off on a tangent-redirect!)  Back to my goal.  Try to do 1-5 of these designs a day to catch up.  Leah's also started a new quilting project this year but I've not even checked it out yet because I really wanted to finish Selvage Diamonds.  Here's what I have so far:


Not a great picture-forgot to turn the flash back on.

Close-up of the first 5


Next 4

Don't really like the upper right one

Like most of these

Kind of fun trying each of these

More fun

These take a little longer than some but I like them.

What I did last night.
I wanted to do more but it was getting late and needed to get on dinner.  I'm planning on doing more today as well as starting a sweatshirt quilt.  The sweatshirts came in the bag with the tee shirts my daughter wants made into a quilt for her college graduation gift.  I've wanted to play with making a rag-style quilt using sweatshirt so this is the perfect opportunity.

Happy Stitching!


Tuesday, January 24, 2012

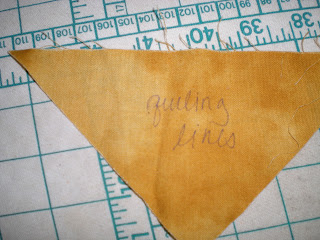
 Okay, so here's how the experiment went.  Here is the pen markings on the fabric.  I just noticed I spelled "quilting" wrong!  (Bad Spellers Untie)!  So I'll use the pen for "quiling"!

 Anyway, this is what it looks like when marked.


 Next, I applied a hot iron to the markings and, as promised, the marks disappeared!  No sign of my "quiling lines"!


Then I put it in the freezer for about 5 minutes.  If you look closely you will see the markings.  They aren't as bright as before but they are there.


So I threw it in the washer to see if the markings would wash out.


They did not wash out completely.  

So, what to do?  Do I use it to mark my quilts?  Maybe.  The only reason my quilt would get that cold is if I were shipping it somewhere.  And I'd only be worried if I were going to show it.  If I'm making my "Masterpiece" I will use another form of marking.  Truth be told, I prefer soap slivers to mark but the lines are really thick!  I do think I'll use these pens on a quilt in the future but not the hand pieced Feathered Star!


Today a friend of mine who recently started quilting came over to start the Craftsy Block of the month.  We took waaaaay longer than needed but had a good time!  I really didn't want to go out and get MORE fabric for this project so I hit my stash.  I had some Aunt Gracie fabrics put aside for a future project I don't think will be started any time soon so I'm using them for this project.  I'm hoping to keep up with this and have the top done by the end of the year.  Two 12-1/2" blocks (unfinished) a month should give us a nice sized quilt at the end.  No pictures of the finished product so kind of a mystery quilt!


The first 2 blocks

Happy Stitching!